Happy New Year! I have 1 day of vacation left and I’m still in an organizing frame of mind. I have been working on my citations and have several pieces of missing information. (New “resolution”: ALWAYS write down the total number of images on FamilySearch films that are only available to view at affiliate libraries as you are looking at them!) So in the back of my mind, I was going to go to the library this afternoon to find this information. But of course, the library is closed today – as I would have realized it would be if I had only been thinking clearly!
So instead, I’ve decided to use my Bennett research to think of a better way to organize the information that I have been gathering. What type of information? Excel and Word documents! I always feel so “scholarly” when I open a Word document and begin to document where I’m researching and what the result of each search was. It’s not unusual for me to be writing these documents while at the library and I then save them to my Google Drive. But I don’t do a very good job of naming these files. Sometimes, it’s just the date (as if I’ll remember that date that I found that missing record!) The name might make perfect sense to me at the time, but months later, I will see that document in my list of files and wonder, “What in the world is THAT?” In the same way, adding information in Excel files makes me feel like I’m oh so organized, but does that matter if I forget that I’ve created the file?
I need to think of a way to NOT forget about these documents because they just may contain a nugget that doesn’t fit my puzzle at the time, but gives me the perfect hint later on. And I need to think about whether the information has been added to my research notes, or my Family Tree Notebook files that I’m trying to put together to pass on to the next generation of family researcher.
I’ve always had the goal of having all of the information I have found for an ancestor in an Excel file. I started this plan with the Ancestor Inventory that I developed. Over the last year, I have added another tab to this Excel file for Russell County, KY Resources.
I created this tab in my Blank Ancestor Inventory with the goal of listing every single book, website, or FamilySearch resource for Russell County that I have found along with links to any of these things that are found online. As I create citations for any of these records, I am copying the citation as a template to be used for future research and include that in a different column. Each of these citations WILL include the total number of images or pages so that I don’t have to go back to the library just to find this information (which is PROBABLY in one of those Word documents that I’ve forgotten that I created.) Once that tab was created, I copied it into each ancestor’s Inventory. Now, within each ancestor’s personal Inventory, I can hide any rows that are out of the date range for that ancestor, to ultimately give me a nice list of all possible information that I might be able to find at this time. And at the bottom of this list in the Blank Inventory, I’m going to list who’s Inventory the list has been added to along with the date. That way, if I find a new resource, I’ll know who’s individual inventory I’ll need to update. So what’s included in this Russell County, KY Resources tab:
The first column is used for a Y/N to show if a resource has been search and if contained information on my ancestor.
The 2nd column is the name of the resource with link added, if appropriate.
The 3rd column is used for date ranges and/or book call number. I’ve also used this column for “sub-resources”. For example, the 1860 census has 7 sub-resources. The Agriculture Schedule, Manufacturing Schedule, Social Statistics, DDD Schedule, Mortality Schedule, Slave Schedule and a link to Instructions for Enumerators. Some census years include a link to the ED map for that year.
The 4th column is used for the citation template. With my template, I’ll be able to adjust a few pieces of information (names and page numbers mainly) and have a quick way to create a final citation.
The 5th column is used for notes. The notes might be about image quality or a question I’d like to research further. The note might indicate that there is no index along with a list of pages that have been searched so far.
And of course, any Excel files that I’ve created can be copied over to each Ancestor Inventory if there’s information for that ancestor. HOWEVER, there needs to be a way for me to note where the document can be found, or the original document needs to be deleted so that if/when I add information to that spreadsheet within an ancestor’s workbook, I’m not adding to the original and forgetting to add to the ancestor.
I’m going to add one more tab. This tab will contain a list of all of the Word documents that apply to the ancestor and what information is included in the document. As I am doing this, I will have to consider if the documents can be combined in some way or if the information would be better in a different format.
That is my plan for now. I think this may be a “slow” week for work as the new year ramps up again, so I’m hoping that I can get everything for an ancestor into 1 Excel file workbook (Ancestor Inventory) starting with Silas Bennett. As I work on his workbook, my plan may adjust here and there, but this is my plan for now.
I can’t believe that we’re almost ready to say good-bye to 2023! This has been a very busy year and I don’t feel like I got to do nearly as much genealogy research as I had hoped. In fact, research opportunities have been pretty scarce.
With my current job, taking vacation time means no income for that period, but this year, I decided that I really needed an extended break. So I’m off all week and just now getting out of the post-Christmas crash. I want to do something genealogy related, but I’m feeling very scattered. Do you ever feel that way?
What do I have? Where is it? Has it been digitized? Do I have nice source citations? How do I REALLY want to keep this stuff? Printed so I can flip through everything and scribble notes and questions in the margins? In file folders in a filing cabinet? In binders?
New Year’s Resolutions rarely seem to pan out for me so this morning, instead of thinking about resolutions, I decided that I would get back into the swing of things by organizing the papers on my desk and in the mini-file drawer that attaches to my desk. I received some very nice archival storage items for Christmas, so I’m putting documents into protectors while I think about the file folders/binders thing again. I LOVE having paper copies of most things because I feel like I comprehend paper easier than the computer screen. But I don’t REALLY want a print out of every tax record, for example, so where do I draw the line? Right now, I’m not planning to print out anything, just organize what I already have while I think about this.
Once these things are organized, I can move items to my filing cabinet or binders. But another thing I wanted to do was to have a list of everything that I have for specific individuals. 2023 was the year of Bennett family research, so I’m starting there.
First, I’m making a bulleted list of all of the digital files that I have for each individual. Once my list of digital items is complete, I will have a nice way of seeing if I have items in my files or binders that still need to be digitized – and then added to the list. My list is in chronological order to help me find things quickly. I can also use the list to make sure I have included everything I’ve found for an individual in the notes that I have for each person. For my notes, I’m using Family Tree Notebooks and the GoodNotes app on my iPad. Eventually, these pages will be put on the internet so that I can share them with family.
Under each bullet in my list, I’ll have 1 sub-bullet with the source citation. If an item is a physical item – like a yearbook – I will add another bullet telling where the item is located. And if going through my files in this way brings a question to mind, I can add that with an additional bullet so I don’t feel compelled to dig for an answer at that very moment.
I have also developed a habit of creating timelines and analysis notes in Word, but sometimes, I don’t remember to go back and look at these again. I think I’ll be adding these documents to the list as well.
I like this approach for my citations because once I’ve created a citation, I can modify it as necessary and add the citation to other members of the family. For example, I can create a citation for the 1860 census for my great-great-grandfather, who was 7 years old at the time. That citation will also be slightly modified and used for his father – my 3x great-grandfather. HIS father was also alive at that time, so I use the same “base” and modify the pieces required and quickly have a citation for him as well. Fathers and sons often appear on the same page in the tax lists, so I can copy a citation and then paste it in another list and just update the line number. I can have lists for 5 generations of Bennett men open at the same time and use this copy and paste method to not feel as overwhelmed as starting from scratch for each man.
Of course, as I type this, it makes me think about the wives. Their items will need to be added as well, but there won’t be nearly as many items for them. As for children…right now, I’m thinking that if I have a birth or marriage record, those will be added, but I don’t want the list to become too difficult to understand with multiple people included, so unless I’m going to do a specific list for each child, I will limit these records to birth/marriage/death assuming the event happens in the lifespan of the ancestor each list is targeting.
In 2022, I took a very nice course on citations from Lisa Stokes and part of that class included access to her citation templates in an Excel document that she keeps online for her students, so I’m using those to help me quickly create the citations for my records. For example, when it comes to tax records, I may have 40-50 records per person, depending on how long my ancestor lived. Being able to copy and paste citations will be a sanity saver!
When I start with a citation “base”, I like to add it to Word and then any parts that will need to be modified from year to year are changed to red so I don’t forget to update anything. I copy that citation template and because these families never left the county, I can quickly paste and update the template with the correct year/page number/line number so the citation for each year of tax records goes very quickly. And this is the kind of thing that doesn’t take tremendous concentration, so I can work on it from my travel laptop in the evenings while watching tv or while traveling in the car, if I want. Or it can be the perfect thing to work on if I have a smaller chunk of free time during the day and I just want to get a few citations done.
If you’re looking for a nice list of template citations that you can copy and paste, I’m sure there are many on the internet, but I do like this list from Family Locket. Lisa Stokes has several videos on YouTube discussing source citations. To find these, I search for “Lisa Stokes Genealogy” and then click on her image to see all of her videos.
After census and tax records, I will move through all of the deed and court records that I have and then look for any newspaper or newsletter citations that I need. Other less common records (yearbooks, letters, military items, etc.) will come last.
By using this “assembly line” method of working on citations, I can get it done pretty quickly and not feel bogged down with “creating” citations one at a time. Once I have them all typed out in the list, it will be easy to copy and paste the final citation into whatever document I’m working on – from transcriptions to research notes.
During this process, I’m not only checking to make sure that I have everything cited properly, but I can also confirm that I have downloaded everything from Ancestry or FamilySearch as I go so I don’t have to worry about someday losing access to a record. After all this, I will feel more organized and confident in what I have. I will keep these lists on my Google Drive so I can access them from anywhere – but especially from the library in case I need to double check something or to quickly find a record again if necessary.
What are you doing to prepare for a new year of research? I’d love to hear about it in the comments!
…giving a presentation on your brick wall ancestor? You may be thinking, “I am NOT a public speaker”, or “I don’t know enough, that’s why they are my brick wall!”
But I’m not really thinking about GIVING the presentation, but instead, on creating the presentation. One thing I can testify to with certainty is that you will almost always learn something new when you are preparing to teach something to someone else.
Think about every genealogy class you’ve ever watched. What do they all have in common? PowerPoint. The presenter always seems to have a PowerPoint presentation, even if they are demonstrating how to use a tool or website. They are using PowerPoint to present information or a list of steps. They highlight important information and show images to illustrate what they are discussing. Quite often, these PowerPoint files (or a Word version of the presentation) are available to download.
I am suggesting that you put together a PowerPoint presentation AS IF you were going to give a presentation. Imagine that you get the chance to present your ancestor information to the “Society of Brick Wall Ancestors”. (Wouldn’t it be cool if we put together a Facebook group like this for Russell County, Kentucky?!?) Think about what information you would share to give the Society all of the hints you possibly can so they can help you with future research.
What if you don’t have PowerPoint? My suggestion is to create a Google account, if you don’t already have one. Get familiar with your Google Drive. Click on New in the upper left corner and select Google Slides. These are just about identical to PowerPoint. And if you are feeling overwhelmed, just Google “Using Google Slides” and you will find all kinds of video tutorials to help you out!
How would you put together such a presentation? Begin with an outline of what you think would be helpful for others to know about your ancestor and what question(s) you have. For example:
“Ancestor Nameplate“. What in the world do I mean by that? I imagine a plaque with the basic information that I know about my ancestor. John M. Smith born about 1775 in Virginia died Sept 1835 in Russell County, Kentucky
Make this page as fancy and creative as you’d like by selecting from some of the themes or design suggestions that these programs will be giving you. You could also include simple information on parents, spouses, and children.
What do I know and how do I know it?
How often have you looked at a date for your ancestor and wondered where you got that from? Did someone in the family tell you a date? Did you see it in someone else’s tree? Do you have a document to “prove” that date? Try your best to tell where you are getting your information from.
Telling what you know might take several slides, but perhaps you only know a couple of facts so it might be all on one slide. If you have quite a few facts, think about breaking slides down by topics and might include:
Birth (when/where was your ancestor born and how do you know that?)
Marriage
Locations
Death/Cemetery
You will want to include absolutely EVERYTHING you have on your ancestor. For example, if you have 10 different records that relate to the marriage (or marriages) of your ancestor, you will want to include all of them. Have lots of tax records? Make a list of all of them.
Consider making this list chronological to help give you a timeline of your ancestor’s life. If you have transcribed records or created your citations, be sure to include those things.
What would I like to know? At this point, you MUST limit yourself to one question per slide. Even if you have tons of questions, there can ONLY be 1 question per slide. Put this question at the top of the slide and make it stand out. Bold text or Italicized text or using colors.
Below your question, make a list of what you know and how you know it. For example, I have a date of birth about 1775 for John. I am basing that on very early census records and the year when his first known child was born. I need to list which census and what that census said. Think of this as explaining your thinking while standing over the shoulder of the person looking at your presentation.
As long as you’re working on your slide, you might as well give some information on where you can find your “source”. Have you downloaded the census record? Tell where the record is stored on your computer. Are you keeping track of the record on Ancestry or FamilySearch? Go ahead and give the link to get there. No reason for anyone to have to spend time looking for a record that you are referencing.
Have you taken the extra step of transcribing a record? Add the text to your slide! Is your information coming from something like a family Bible? If possible, add the image of the page to the slide.
It’s important to help whoever is looking at your presentation (even if it’s you!) to be able to see and absorb all of your information without having to stop and look it up.
Remember that this is a digital record, so take as many slides as you need!
What if you “know” some information because a family member told you so. Indicate that as well. No judgements on not have a “real source”, but you’d always want someone to know that “Mom says they always celebrated her grandfather’s birthday on May 8” or something along those lines. I have a birth date for my great-grandfather and the only source that I have for that is a letter that my grandmother wrote giving information for her immediate family. I suspect that date is also written in a family Bible, but I do not know who might have that Bible.
What if you “know” something because it was in someone else’s tree? At a minimum, tell the screen name and web site you found the information. If possible, give a link to that tree. I always tell myself that people aren’t pulling information out of the air, so there is probably a record somewhere that a person found, they just aren’t sharing it. And it just might be that as you put all of your information together, you figure out that this person’s tree is incorrect.
If that’s the case, don’t just toss the information, but instead, tell why the tree is incorrect so that you won’t re-collect that information later when your research is not as fresh in your mind.
If you have corresponded with the tree’s owner, but sure to indicate that as well, giving as many details as possible.
Where have you looked and where might you look next? Remember, you should just be thinking about 1 question at a time! You can repeat slides 3 and 4 over and over with each “set” focusing on one question only. But if you are finding that you have several questions, you might consider breaking your presentation down into several individual presentations. You can use the same slides from the beginning of the presentation but have the goal of just one question per presentation.
Think about dividing your slide in half – left side for where you have looked and right side for ideas where you can look next. If you aren’t very familiar with PowerPoint, don’t worry about trying to make your slides fancy. Just get the information in there. If it’s easier, you can have 1 slide with where you have looked and another slide with where you might look next.
How do you get ideas about where you might look next? My personal process is to use FamilySearch. I go to the county that applies to the timeframe of my question and look to see what’s available. After that, I search the card catalog for Ancestry. You’d be surprised how often FamilySearch isn’t permitted to show images from a record set, but Ancestry has them.
Don’t forget non-genealogy sites like newspaper sites, library sites, Pinterest, Facebook, and general history sites about your family or county.
Extra “Goodies”. Consider having slides about other family members (siblings, children, in-laws) and neighbors. Quite often, your ancestor will be a witness or will sell land, etc. to an unfamiliar name and later you will figure out that it was a son-in-law or a family member of a future in-law. Or seeing a neighbor’s name will help you to zero in on the correct person if there are more than 1 person with the same name in the same area.
What’s the point of creating this?
First of all, chances are pretty good that as you’ve been creating your presentation, you will notice something that you never noticed before. As I said earlier, you will almost always learn something new when you are preparing to teach something to someone else. Or you will be tempted to “jump down the rabbit hole” on a new records set that you haven’t dug into before. My suggestion is that you make a note of it (maybe make that text red) and come back to it later. While working on this presentation, you are in “collect, analyze, and reconnoiter mode”. You are collecting everything that you have, analyzing it for new information and then planning out next steps. If you jump out to do research every time you get a new idea, you are likely to forget where you were at in the process of creating your presentation.
Once you’ve completed your presentation, whenever you do research on your ancestor, be sure to update your presentation with any new information or notes about successful AND unsuccessful searches so you don’t go back a year from now and search locations that you’ve already searched.
And if you are lucky enough to have a family member who enjoys genealogy or a “research buddy”, share your presentation with them and ask them to give you feedback. Do they have questions or suggestions you haven’t thought about? Do they have some records for your family that you didn’t know about? Maybe you will have information that will help THEM out and that will make them more likely to help you out when they find something new!
Even if you never share your presentation with anyone else, the exercise of putting it together will likely be a valuable experience.
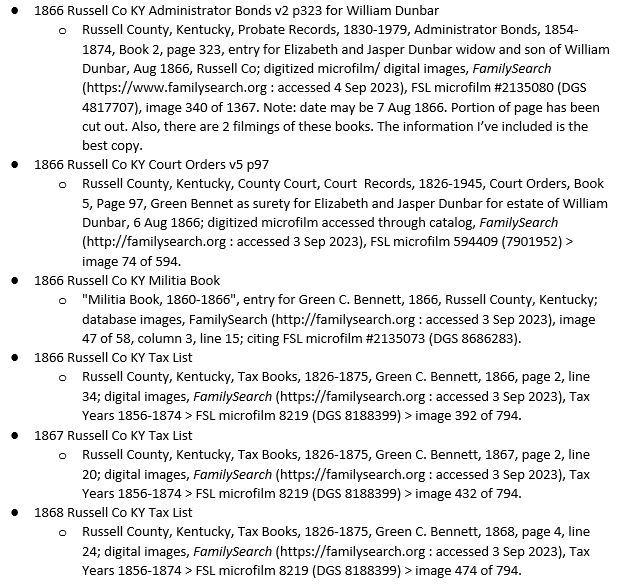
Recently, Ancestry gave me a record hint for Green C. Bennett in the U.S., IRS Tax Assessment Lists, 1862-1918. The Internal Revenue Act of July 1, 1862 authorized the collection of taxes on goods, services, licenses, income and personal property to raise money for the civil war.
On this page, I can see that Green was being taxed for 12 pounds of cotton at a rate of 2 cents per pound, resulting in a total charge of 24 cents. Pretty boring stuff, but I enjoy finding every detail I possibly can for every ancestor. This was in 1865, exactly half way between census records. That’s a nice place to find an ancestor if you are trying to narrow down a date of death between census records. At this precise moment, Green had 7 children with another due the next month. I’ll bet he would have preferred to keep that 24 cents in his own pocket!
I started wondering if that was the only time he would be found – or if I had other ancestors who might be found in these same lists. I was hoping for a list of all the names found for Russell County, but you can’t search by county. I didn’t want to take time to search for individual names and I know that not everyone has Ancestry so I decided to see if the lists were available on FamilySearch. (I will admit that Ancestry will probably find all of my ancestors just fine if I look at their hints because the documents are crystal clear and easy to read, but I was in the mood to dig!)
I went to the FamilySearch catalog and ended up finding it by searching for Place: Kentucky. Then I scrolled down to the Taxation section and found Internal Revenue assessment lists for Kentucky : 1862-1866. This resulted in a pretty long list of films divided by District and Rolls. You can view films from here, but if you keep going, it will be more helpful.
Let’s assume that you do stop here. I will tell you that Russell County is in District 2 through December 1865, then it became part of District 3. For Russell Co, look at District 2 Rolls 5, 6, and 7 and then District 3 Roll 14. (You can also view the lists by Roll on Ancestry.) If you aren’t looking for Russell County, open any roll and around image 7, you’ll find a list of every county with their District and Roll numbers. Getting to the lists using this path results in different versions of the films – fewer files (5 rolls), but more images per file. I’m not sure why there are different versions of the films. If you compare DGS numbers, they are identical for both versions, so that can make it very tricky to find an image later depending on which version you use, so be aware of that when you create your citation. And as always, I recommend you download anything you find and document how you got there.
But what if you didn’t scroll down to that long list of films?
At the top of the page you will see red text that says, “United States Internal Revenue Assessment Lists are available online” with a button to click. This takes you to a page with a large yellow section at the top and there is an option to click that says, “Browse All 403,116 Images”. Sounds intimidating, but this will help you to narrow down exactly which films you want to view for your county.
Clicking the button takes you to a list of links for each state. Click on Kentucky and you will get a list of links for each county. Clicking on Russell County will show a list of 7 films – all of which contain Russell County records. the number in the front of each link is the Roll number. Click here to get to this page.
Clicking on the films from THIS list will allow you to use the image numbers that I’ve listed below to go directly to the pages that contain Russell County citizens. Again, I don’t know why there are 2 versions, but this was the path that I used to get to the films, and therefore, this is the path you need to take if you want to use the image numbers listed below so you don’t have to look at each page to see the county. If you don’t take this path to get to the films, the image numbers will not match up correctly.
This record does not contain of ton of information, but maybe you’ll find something significant for your own ancestor. Happy Hunting!
Roll 5 – District 2 – annual list for 1863, monthly beginning with May 1863
Names are alphabetical.
Annual Lists 1863 (206 images)
30-36 – Division 4 – Russell and Casey 1863
75-79 – Division 4 – annual 1862
80 – Jan 1863
81 – Apr 1863
82-85 – May 1863
86-87 – Jun 1863
88-89 – Aug 1863
Monthly and Special Lists June-Dec. 1863 (158 images)
29 – Jun 1863
50-51 – Jul 1863
67-69 – Aug 1863
91-93 – Sep 1863
117-120 – Oct 1863
146-148 – Nov 1863
180-182 – Dec 1863
Monthly Lists Dec. 1862 – Apr 1863 (97 images)
23-27 – Dec 1862
37-38 – Jan 1863
(no list for Feb. – Apr.)
Roll 6 – District 2 – annual, monthly and special lists 1864 (617 images)
37-43 – May 1864
154-158 – Feb 1864
205-209 – Mar 1864
248-250 – Apr 1864
282-283 – May 1864
306 – Jun 1864
(no list for July),
378-379 – Aug 1864
419 – Sep 1864
448 – Oct 1864 – (Russell Co is now Division No 9)
463 – Nov 1864
485 – Dec 1864
510 – Sep 1864 (Division 4)
570-573 – Oct 1864
Special Lists 1864 Oct-Dec (128 images)
30 – Oct 1864
57 – Nov 1864
59 – Nov 1864
115-116 – Dec 1864
Roll 7 – District 2 – annual, monthly and special lists 1865 (1013 images)
113-115 – May 1865 Annual List
199 – Jan 1865 (monthly)
218 – Feb 1865
241 – Mar 1865
264 – Apr 1865
287 – May 1865
310 – Jun 1865
330 – Jul 1865
347 – Aug 1865
364 – Sep 1865
383 – Oct 1865
402 – Nov 1865
421 – Dec 1865
450 – Jan 1865 (special list)
485 & 487 – Feb 1865
531-532 – Mar 1865
582 – Apr 1865
630-633 – Apr 1865
634-636 – May 1865
687-688 – Jun 1865
778 – Jun 1865
779 – Jul 1865
840 – Aug 1865
892-893 – Sep 1865
928-929 – Oct 1865
964 – Nov 1865
996-997 – Dec 1865
Roll 14 – District 3 – 1866 annual and monthly lists (352 images)
My husband and I own our own business and last week, while looking at our schedules, we discovered that we have some time coming up that will allow us to get away for a bit. So I convinced my husband that it would be the perfect time of year to rent a houseboat on Lake Cumberland! While I do plan to take along my small laptop so that I can do some genealogy if the weather isn’t cooperating or if I need a break from the sun, there is one specific cemetery that I know I want to visit while there. And I’ve started thinking about the types of pictures I want to be sure to get during our visit. It isn’t a very large cemetery, so that means I can be pretty loose with my list because I don’t have to worry about ending up with hundreds and hundreds of potential photos. Here’s what I’m thinking:
Obviously, I need to get a photo of the cemetery entrance/sign. Yes, I can get this photo from Findagrave, but this will provide a reminder of exactly which cemetery I am at when I look back at these photos on my phone at a later date.
A screenshot of my phone map app showing all of the surrounding roads.
Any type of bulletin board with history/contact information.
Any historical markers that might be in the vicinity.
If I find a stone that I’d like to record, photos of all sides of the stone, even if they are blank. That way, I won’t wonder if I simply forgot to get the photo or if the stone was blank on the back.
In addition to photos of the entire stone, I will also get close up photos of areas of text on the stone.
I’ve been watching some videos on the best way to use lights or reflectors to make a stone more readable, so that should be interesting to try.
When I find a stone, I will not only take a picture of that stone, but I will also get photos of the stones on either side, in front of, and behind my stone.
I will step back and try to show any “landmarks” near my stone – ornate stone, large tree, or bush.
Because this is a small cemetery, all stones with the same surname even if I don’t recognize the name. (Depending on the time, I may try to get photos of every stone – especially if we are successful with using the light/reflector.)
We have a drone for our business, so we are also planning to take photos from above. I’m hoping to be able to label the stones using those photos to show who is buried where.
Can you think of anything I’ve missed? If so, leave me a comment!
Some days, I’m itching to do some genealogy research. But for one reason or another, I just can’t get interested in any of the projects I have going. That’s when I turn to Facebook.
I’m a member of several Facebook groups dedicated to research for the state and county that the majority of my research revolves around. And quite often, people will post questions there. I enjoy taking a look to see what I can find to help these researchers find the answers they are looking for.
Sometimes, it’s locating a specific record and sometimes, it’s explaining the process our ancestors had to go through to accomplish something, like getting a land grant. I enjoy being able to locate items that are not on the typical genealogy websites – like local newspaper sites, secretary of state sites, and such.
And more often than not, while I’m doing THAT research, it re-kindles my interest in my own research. It’s not uncommon for me to think of a new way to approach a research question that I’ve been working on for my own research.
Looking at a research problem with “fresh eyes” almost always leads to good things – and not just for the person you are helping out!
Looking for a research buddy? If you’re a Russell County, Kentucky researcher, I’d be happy to consider “swapping families” for a week-end of research!
A couple of days ago, my son texted me and asked for a picture of his grandfather. My husband’s father passed away in an accident in 1997, when my son was only 4 years old. I was surprised to hear that he didn’t have any pictures, but thinking about how young he was at the time, I can see why.
So I sent the picture and the file name had his full name. He had gone by his middle name his entire life because he and his father shared the same first name. My son asked, “Papa’s name was Ervin?” and I had to explain. He told me that his older brother didn’t know that either.
Is it ironic that the genealogist in the family has never shared this information with her own children? Perhaps because they’ve never expressed an interest or because they was so young when the accident occurred. But it did strike me as ironic.
As I’ve been working on my Family Tree Notebook files, I’ve been focusing on ancestors from long ago, because they have more “historic” records to display and analyze. But now I’m going to shift my focus for a while to our most recent ancestors, to tell their stories, as if I was pulling out a picture and saying, “This was your Papa and he was…..” I want to tell the stories and share the memories – and not just mine, but my husband’s as well. Last night, I shared the GoodNotes app with my husband and showed him how to start adding HIS stories and memories to the notebook. I spent yesterday adding every digital photo, yearbook photo, and newspaper clipping that I have to the notebook and it will be interesting to see what types of memories my husband has that I never knew! I’m hoping that he will enjoy the process and will then be willing to do the same thing for HIS ancestors. He’s already talking about taking a trip to visit his aunt who might be able to tell us even more.
Do YOUR children know the stories of your parents and grandparents? We always talk about interviewing the oldest generation now before it’s too late. But are you sharing that information? My children may not look at the notebooks I’m creating until after I’m gone, but I want to know that someday, they can know everything that I know about these people who have meant so much to me during my lifetime.
Not too long ago, I saw something on Pinterest that looked very interesting to me. Carly Morgan is a genealogist who has put together a system called “Family Tree Notebooks“. She sells pre-designed PDF pages that you can purchase in bundles or individually. She sells the pages with 24 different color themes, so you can use different color themes depending on how you like to organize your notebook.
I think that I have looked at something similar to this before and purchased some pages to use for a family reunion my husband’s family was having. But they didn’t work well with what I was doing so I didn’t get very far with it. This time, these pages just kind of clicked with me. They are fairly simple pages. A colored stripe on one side of the page and a title running down the opposite side. Some pages having nothing additional on the page, while others have pre-created text. For example, all of the questions for each census are already included on each of the census pages.
I did a lot of research. I watched videos (she has a YouTube channel) and looked at the variety of pages over and over, because I am notorious for finding something that I think looks really cool, spending a ton of money for it, and then never using it. But after spending a couple of weeks really researching and thinking about it, I decided to take the plunge. The cost investment for this system is pretty minimal. I picked a color and purchased a USA Deluxe Family History Bundle for about $40.
That bundle includes 204 pages in a left hand version and duplicates of those pages in a right hand version. Additional pages with a huge number of topics are available individually for $2. Those pages come in all 24 colors, so if you’re hesitant, you could find 1 page that you’d like to practice with and then pick the color you like from the selection of pages in the download that you get.
In her videos, she shows how you can edit the pages using an iPad app called Goodnotes. That is the system that I am using as well. You can use any app that will allow you to annotate PDF documents and even use Adobe Acrobat, if you have it, but I love all the helpful videos you can find about Goodnotes because a ton of people use it for bullet journaling, planners, and taking school notes. And I love working on these pages on my iPad because it is so portable.
Once you add a page to your templates in Goodnotes, you can add images (stored in Google Drive or Dropbox) such as family photos, cemetery photos, and images of documents and newspaper clippings. You can also type text in a variety of fonts and colors, hand write text, draw shapes and use a highlighter. Resizing and rearranging on a page is simple. There are lots colors to chose from for text boxes and hand writing and drawing shapes. There is a free version of the app which allows you to have up to 3 notebooks. After about a month, I went ahead and paid the $9 for the version of the app that allows unlimited notebooks.
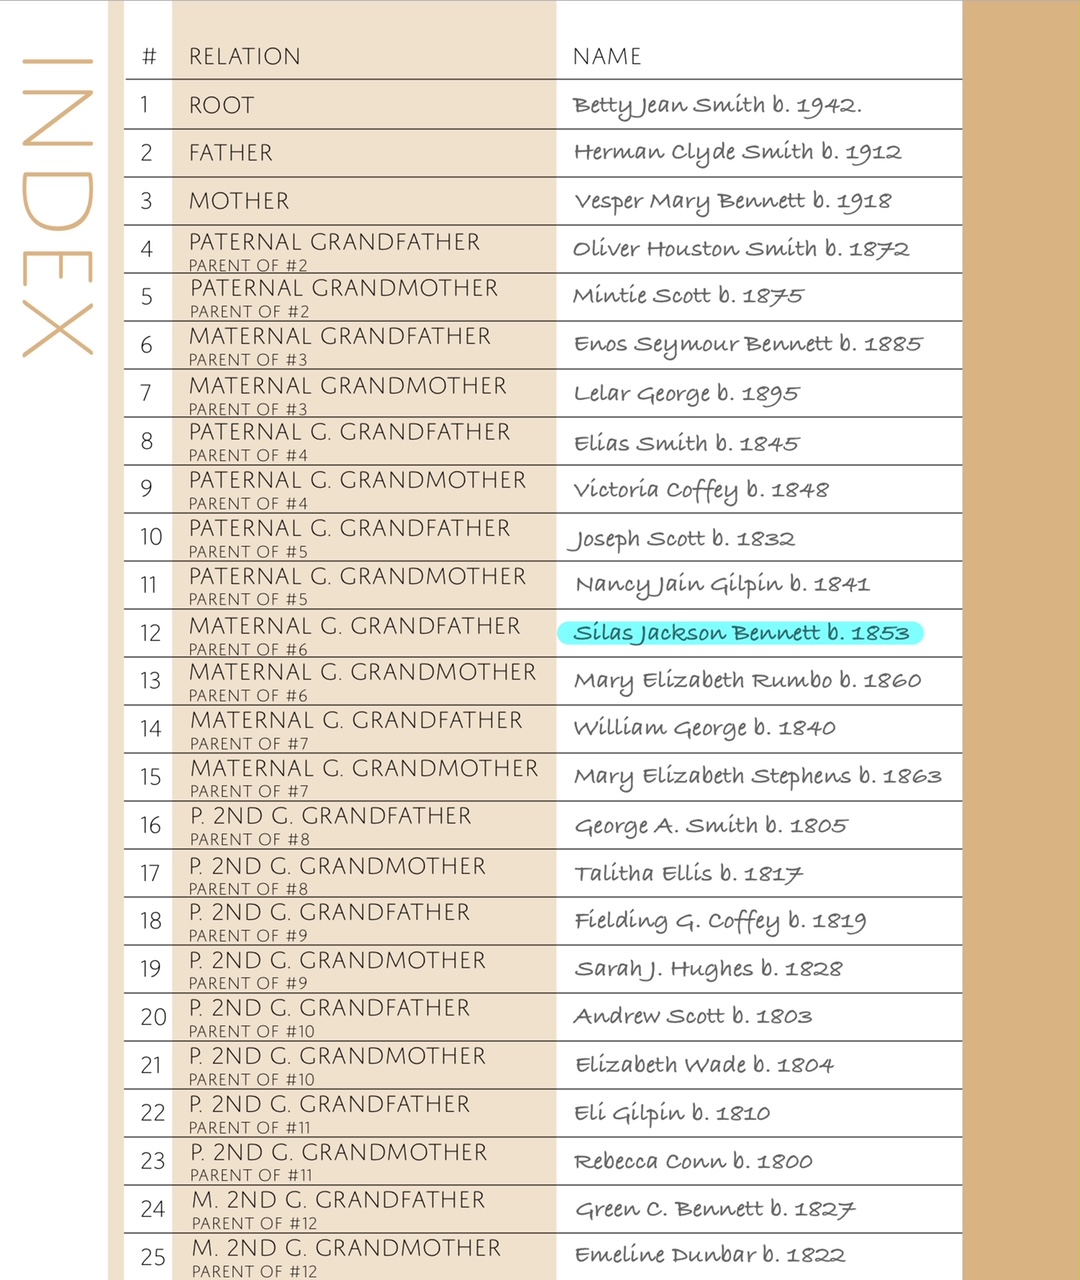
I started with the target of my current research – Silas Jackson Bennett. Carly has index pages for up to 6 generations of ancestors which allows you to enter the names of your relatives as well as an index number, which can be included at the bottom of every additional page. So if you have multiple people in the same notebook, you can add their index number on a page to show exactly which ancestor the page refers to. When I created this page, I used the highlighter to show exactly where Silas is in my tree. The page was created with the numbers and relationships, I just added the names and dates.
Carly’s pages come in a right-side version (color border on the left side of the page) and a left-side version (color border on the right side of the page) so you can create pages that are only printed on one side of your paper or front and back.
I decided that I will print front and back and because of that, all of my pages will be 2 page spreads. I selected a “skeleton” of pages to start with. I begin with the index pages, then I have a blank page for a “Life Story” and then the pre-created page for the Ancestor Profile which includes space for a picture, if you have one, and an area for all of the basic statistics as well as an area for notes. I don’t have a picture for Silas, so I added a silhouette image of a farmer behind his horses and plow.
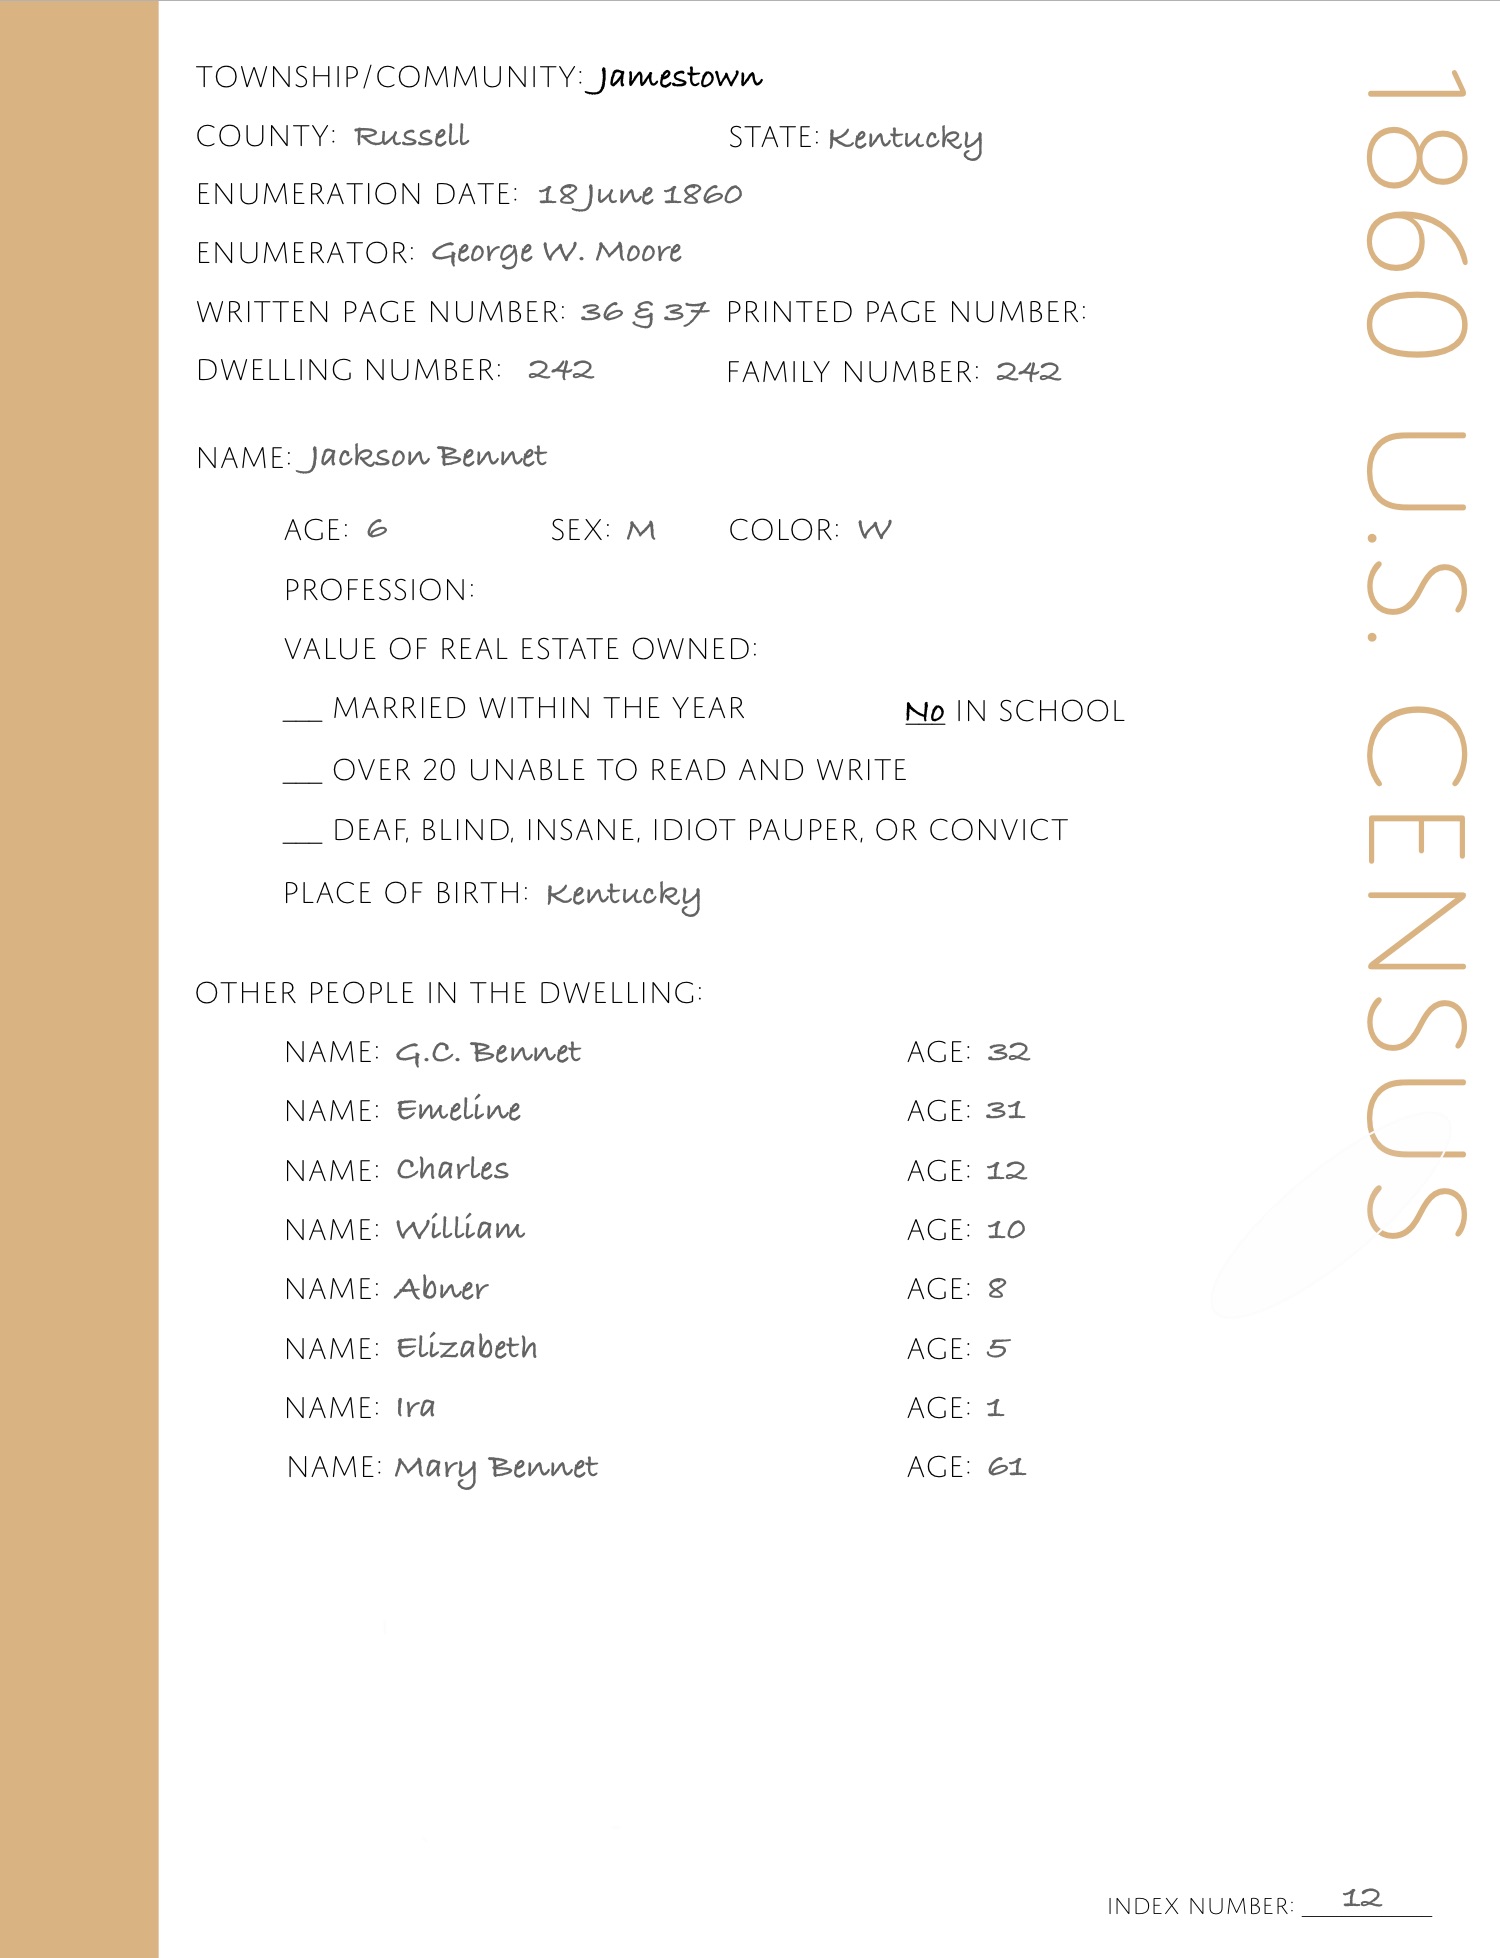
After that, I add a blank page, then a census page – blank page and census page – continuing until I have all of the pages for the census records through an entire lifetime. Each of Carly’s census pages already has all of the census questions included so you don’t have to type those out – you are only adding the information that your ancestor gave. On the blank pages, I add an image of each of the census records that I have downloaded to my Google Drive plus a zoomed and cropped image showing just the family I’m referencing. These pages make the skeleton of my book. They are the beginning of the timeline for my ancestor and all of the information I have been able to collect for them.
From that time on, I add pages 2 at a time for each specific event that I have researched. I add them so that everything is in chronological order. For example, Silas has census records in 1860, 1870 and 1880 and those were the first pages that I included. He was married in January of 1880, so I inserted the pages for Marriage records between the 1870 and 1880 census. Right after the marriage records, I add a Spouse Profile page for the spouse’s information. I actually have a birth record for Silas, so that goes before the 1860 census pages. Land records go in chronologically based on when the land was purchased. Probate and cemetery information comes at the end. And if I have a blank page anywhere, my plan is to add a map of Russell County that corresponds to the time period or a newspaper clipping of some interesting news from the area or any other bit of historical information that might apply. Each of my notebooks also contains pages for each of the children and their spouses.
Some days, I sit at my computer to research and I have my iPad on my desk. As I find a record, I add it to my Google Drive (which is my normal work flow anyway) and then add a page in the appropriate place in my notebook to add the document image to. Often, I’ve already transcribed a document, so I copy and paste that text from Google Drive on my iPad onto the correct page in the notebook.
If I’m not “doing research”, my general strategy is to take my iPad with me when we are out running errands so that I can work on a notebook at the drop of a hat. The app gives you the ability to flag a page and I like to mark pages that would be easy to work on without being connected to the internet. This usually involves zooming in and aligning my text more precisely. My husband LOVES shopping at Costco. I, on the other hand, am not a fan. So I stay in the car, grab my iPad and start transcribing the record images that I’ve added. Sometimes, I spend the time moving items on my pages to make them line up the way I want or rearranging pages that may have gotten out of order. Sometimes, I page through what I have done and add text boxes so that I can write short paragraphs based on the document on that page. These paragraphs will eventually be combined onto the Life Story page. It’s soooooo much easier to write a sentence or two about what a document is telling me than it is to think about writing a “life story”.
When I think of a question I’d like to research, I add a Research Log page and put the question in so I’ll remember later when I have dedicated time to research. When I do start to research, I add the information for each set of records I look at and what I was able to find in each record set, or if it was a negative search. Eventually, before printing, these pages will either be removed or moved to the very end of the notebook. If I’m at home and researching, I keep the iPad nearby to make transcription a little easier by looking at the document on my computer monitor instead of swiping to a different page in the notebook. In the evenings, my iPad sits next to my chair in case the mood to work strikes.
Sometimes, as I’m thinking about a document, I will decide that I need to take a look at another person’s records. For example, I may need to look at some land records for Silas’ father in order to figure out exactly where Silas was living as a young boy. I have made a decision that whenever I LOOK at a record for a different person, I just go ahead and create a notebook for that person and add the document. If I’m going to be analyzing a record, I might as well create the page for it as I go while it’s fresh in my mind and to avoid falling into the “did I look at this already?” trap that I find myself in so often.
When I am working with a document that applies to more than one ancestor, it’s easy to create a page and then copy it and add it to another notebook. For example, I have to change very little to a Census page when it applies to more than one person, such as a father and a child. I just have to update the middle portion which applies to a specific person on the census and then adjust the names at the bottom. I can add additional notes as well. For example, I can add a note telling that Mary Bennet was Silas’ grandmother.
I also enjoy being able to write a sentence or two about a document from a different person’s perspective. For example, an agriculture census record for Silas’s family when he was 6 years old would say something like, “Silas and his 5 siblings lived with his parents in the Concord, Kentucky area where 3 of them were attending school. When not in school, they would have helped around the farm by feeding the cows, sheep and pigs or helping to dig up potatoes.” But Silas’ father, Green C. Bennett’s paragraph with start with “Green and Emeline worked on a 300 acre farm to support their 6 children by raising crops of corn, wheat, and potatoes along with a variety of farm animals.” Every time I look at these pages, I re-read and tweak these paragraphs, knowing that eventually, they will become part of the Life Story at the beginning of the notebook.
It’s very easy to add/delete/rearrange/copy pages, so I feel like I’m working smarter by going ahead and starting a new notebook for an different ancestor with a specific record. Then, when I get time, I add all the “skeleton” pages in the correct places and the new notebook grows from there. Any time something pops into my mind – I go ahead and add it in the correct location within the notebook for that person. It might just be a blank page with a note to myself of what I want to add or research. This works great for me because I sometimes come across a something that I know I’ve seen before while researching but didn’t download or didn’t label it well. As soon as that happens, even if I’m not ready to analyze it, I add, download, or rename it in Google Drive and add it to the correct notebook so I don’t have to find it again later.
This method has been key for me. I don’t get to research every day, so sometimes, I find myself wondering what I was planning to research next. Now, I can leave myself these notes so I know where I left off. I’m usually such a perfectionist that I don’t begin putting things together into a narrative format until I’m “ready” – whenever that might be. Now, I know that I’m adding to my notebook and I won’t forget to come back to analyze or transcribe or collect related items.
The more I work in the app, the more I like what I’m doing. I don’t feel the pressure of “writing a book”. In a way, it’s a “genealogy do-over” because of the transcribing and analyzing that I’m doing as I add things to the notebook. There will come a day when I actually print each notebook and bind them to hand over to the next generation, but I don’t feel like I need to worry about that right now. I like the “a little bit here, a little bit there” approach. And transcribing these records has already helped me to consider things I never thought of before. For example: I was looking at and transcribing the 1860 Agriculture Schedule for Silas and for some reason, the amount of honey he had really struck me. That led to some additional research about honey. Did you know that 200 pounds of honey is about 16 1/2 gallons? How did my ancestor store that? How long did it take to collect that much?
At this point, my notebooks are half research and half narrative to pass on. I don’t know if any of my children will every be interested in looking at tax or land records, but they are more likely to be interested in the Life Story and maybe the census records and any photos I’m able to collect. If that’s what I decide to do, I will easily be able to take selected pages from a variety of ancestors and combine them into booklets based on branches of the family. And if any of my descendants DO decide to carry on with my research, they will have everything that I have along with my thoughts and theories for each document.
I highly recommend this approach to anyone looking for a nice way to get their files into a book-like format without feeling overwhelmed. You don’t have to download Carly’s pages to give this a try. The Goodnotes app is free for up to 3 notebooks and it does include traditional-type pages to get your started. These pages look like what you might get in a notepad from the office supply story and include blank pages, ruled pages, pages with columns, accounting pages, planner pages and “To Do” pages, as well as a few others. If you begin working on pages this way and then later decide that you’d like to change them to some pre-designed pages, it is easy to change the page type without loosing everything you’ve already added.
If you decide to give this a try, I’d love to know how you are doing!
I just received an email to inform me that automatic links to my blog posts will no longer be made to Twitter after April 30. To receive notifications of my posts, click to Follow and enter your email address. I am not able to post as often as I like, but I hope you find my blog helpful! Please follow!
I’ve been working on my Bennett ancestors from Russell County, Kentucky. The other day, I was putting together a table of annual tax information from my 4th great-grandfather, Charles Bennett through 3 generations to my 2nd great-grandfather, Silas Bennett. My 3rd great-grandfather, Green C. Bennett was an only child, so I was making this table to sort through Green’s 6 sons, including Silas. I was trying to figure out where the 50 acres that Silas had been paying taxes on came from, because I could not find any deed with Silas’ name. My theory was the Green was dividing his land among his sons and I was using the chart to compare the numbers of acres each man was paying taxes on.
Soon, it dawned on me that in these 3 generations, my family were the only Bennetts in Russell County! Which means that ANY record I can find for a Bennett between 1826 (when Russell County was formed) and at least 1900 would belong to SOMEONE in my tree. Fantastic!
But now here’s the rub – as I look through various indexes, I am amazed at the number of names that LOOK like Bennett. I’ve seen Barrett, Barnett, Brummett and Burnett – all of which look amazingly like Bennett when written in cursive. Especially when written with poor penmanship (and that’s putting it kindly!) So I really have to concentrate when I see those names, but it helps knowing that all Bennetts are MY Bennetts, so if I see Methuselah B_____tt, I know that isn’t a Bennett because I have no Methuselahs!
Paying attention to EVERY Bennett record has already paid off.
I do not have an exact date of death for Silas Jackson Bennett. I knew that his wife, Mary Elizabeth, was listed as a widow in 1900, but that sure didn’t narrow down the date for me, since the previous census was 1880, when they were newlyweds.
So based on census records only, I knew Silas died between 1880-1900.
Neither Silas nor Mary Elizabeth is listed in the 1890 special census for Veterans, but that really just means that although he had indicated in the tax records that he was enrolled in the militia, he wasn’t a veteran. But Silas’ youngest child (that I know of) was born on 23 August 1891, which means Silas was alive in 1890. That helped me to shave off 10 years to between 1890-1900. So for a long time, my tree just had @1895 to split the difference.
But then I took the time to transcribe the will of Silas’ father, Green. In that will, it says, “Except SJ Bennets heirs they are not to have any part in the above named tract of land.” Now that line in itself is another puzzle, and I suspect there was a rift in the family for some reason. That’s a post for another day. But what I zeroed in on was the word “heirs”. Heirs made me think that Silas was most likely deceased by this time, although I know that might not be true, but that seemed pretty likely. Green’s will was written on 24 Aug 1894.
Based on the will of Silas’ father, I calculated that Silas must have died between 1890-1894. Narrowing down from a 10 year span to a 4 year span was great!
I could not find a will for Silas, but I DID find a record in the Russell County Inventories, Appraisements & Sales Bills v1 p393 in which there was a list of property set apart for the widow of Silas J Bennett. That was recorded on 22 September 1893. Woo Hoo! I figured that was something that probably happened pretty soon after death, so I confidently added September 1893 as the date of death for Silas in my tree. Side note – Mary Elizabeth took two tables valued at $2.50 in lieu of the family Bible…can you hear the wail of anguish in my voice??
But then, today, serendipity was on my side. I noticed after looking at my research notes, that I hadn’t looked through the Estate Settlement books. I think that I was assuming they would have the same information as the Inventory books, but it could just be that I over looked them. Anyway, I found the correct book on FamilySearch for the time period of 1893 and turned to the B’s in the index. Nothing. About that time, my husband brought me a snack to munch on and as I was enjoying my snack, I just started looking at the next pages of the index to see if there were any names that I recognized. Have you ever had a name leap off a page at you? That’s what happened to me as I got to the D’s. I saw that there was a JP Dunbar, administrator for Jack Bennett. I have a list of names I’ve found for Silas (Cyrus, Silas, Jackson, and Andrew) and until this record, I have never seen Jack. But Silas’ middle name was Jackson and in his youth, records seem to indicate that he was called Jackson. Silas had no uncles and no brothers name Jack and knowing that every record for a Bennett had to fit in my family somewhere, it seemed pretty certain that this was Silas!
In the Estate Settlement Book v1 p388, I found a settlement made to JP Dunbar, administrator for Jack Bennett, dated 29 Nov 1893. That made sense to me in my timeline as I thought that he had probably died in September of 1893. BUT, in that part of the record where the clerk talks about recording the certificate in his office – you know, that stuff that is so easy to skip over – it was stated that the settlement had been filed in open court in the December 1894 term. I thought that was funny because I had looked for all court records for a Bennett and that was one that I hadn’t found. But I must have it!
I went to my notes, and I had indicated that I had already look through the Court Orders for 1891-1901 and had not found anything related to Silas. But because I had a specific court term to look for, I went back to search again.
I looked through the Index for Bennetts again and there was nothing new, but now, I decided to look for JP Dunbar and there it was – “Dunbar J.P. apt adm J Bennett”. I NEVER would have found that if I had not been looking for Dunbar – but it makes me think that maybe I should be spending more time skimming through all index pages! Page number in hand, I quickly found the following:
“Elizabeth Bennett wife of Jack Bennett dec came into open court and as the widow of decedent relinquished her rights to administer the estate of said decedent Whereupon the court orders said decedents estate into the hands of J.P. Dunbar sheriff of Russell County for administration to be administered by said Sherriff as produced by law with his bond as sheriff.” Another side note – why wouldn’t the woman bringing the question to the court be included in the index? Because she was a woman? Hmm.
Silas’s mother was Emeline Dunbar, so I made a note to do some research to see if JP happened to be related – perhaps an uncle, but after transcribing the record, I went to add the date found at the top of the page and was shocked to see that this took place in court on 19 December 1892! 1892??? My confidently written September 1893 was off by about a year!
And now, I feel like I will have to do some additional digging to see if there is anything else I may have missed that could narrow this down even further. (By the way, I can’t find anything in the December 1894 term that originally sent me on this search.)
Cyrus, Silas, Jackson, Andrew…and Jack! Barrett, Barnett, Brummett, Burnett, Bennett….and Dunbar! Turns out there’s a LOT in a name!